Build Your Own Integration
DataGuard CPM is designed with an API-first architecture, giving you complete flexibility to integrate consent and preference management into any external system. While Marketplace Integrations are available for many popular CRM and Marketing Automation platforms, you may prefer to build your own integration tailored to your internal systems, custom platforms, or external tools not covered in the Marketplace.
This guide explains how to build your own integration using CPM’s APIs, webhooks, and widgets. It is system-agnostic and applies equally to CRM tools, Marketing Automation platforms, and any other external application that needs to consume or update consent data.
Prerequisites
Before building your integration, ensure that you have:
-
Access to the DataGuard CPM Platform
-
Appropriate API credentials (See API Authentication)
-
Knowledge of your environment’s API and script URLs (See Environments)
-
Administrative access to the integrated system (CRM, Marketing Automation platform, or other tool)
Integration Models
There are two primary ways to synchronise data between DataGuard CPM and your integrated system.
- One-Way Integration (CPM → Integrated System): Common for Marketing Automation platforms. Used where the external system only needs to read consent state and never modifies it.
- Two-Way Integration (CPM ↔ Integrated System): Common for CRM systems where employees may update consent or preferences, and those changes must be pushed back to CPM.
Your integration can adopt one model or support both. The decision depends entirely on how your integrated system manages user data.
Data Model Considerations
Because this guide applies to any external system, this guide does not prescribe a specific data model. Instead, we explain the core concepts so you can decide how best to store consent, preference, and token information in the integrated system.
Consents
You may choose to:
Use built-in consent fields
Some platforms provide standard “opt-in” or “marketing permission” fields. If these exist and match your use case, you may map CPM Permissions to those fields.
Create custom attributes
If your system does not provide built-in fields (or you need more granular control), you may instead create custom fields depending on your configuration, for example:
cpm_email_marketing_consentcpm_sms_consentcpm_telephone_consent
Preferences
Preferences usually require custom fields, especially if they are multi-select. You may choose how to represent them:
- Strings containing delimited lists (e.g.
interests=jazz|rock|classical) - A native field that supports multiple options
Citizen Tokens
If your integration is with a marketing automation system, citizen Tokens are required for any consent and preference management links added to the email, including the unsubscribe link.
You should store the token on the contact record in your integrated system. This ensures that when the integrated system sends an email, it can embed the token into the unsubscribe or preference-management link.
For details on token creation and behaviour, see Citizen Tokens.
Handling Updates from CPM
When changes occur inside CPM, your integrated system must stay in sync. This is achieved through webhooks.
Webhook Triggers
A webhook is sent whenever a Permission or Preference changes. See Webhooks for behaviour, retries, and payloads.
Your webhook handler should:
- Parse the payload
- Identify or create the corresponding record in your integrated system
- Update the mapped consent and preference fields
- Update the stored Citizen Token if your integration uses scheduled regeneration
Choosing the Webhook Type
Depending on your needs:
- Effective Permissions Webhook: Gives full current state of all permissions and preferences.
- Consent Receipts Webhook: Only provides changed values.
Your integration logic should use whichever format best fits your system’s processing model.
Handling Updates to CPM
Many CRM workflows allow employees to update customer permissions directly inside the CRM. When this happens, your integration needs to update CPM accordingly.
When to Push Updates Back to CPM
Whenever a user in the integrated system edits a consent or preference field, you should update CPM. The ideal model is to push updates to CPM every time a consent or preference value changes.
If your platform does not support real-time triggers, you may instead:
- Use save-events
- Use automation workflows / rules
- Use scheduled sync
How to Update CPM
When a user or employee changes a Permission or Preference inside your integrated system, you should update DataGuard CPM using the Transactions API (for Permissions) or the Submissions API (for Preferences). These APIs record new changes and maintain the correct audit history.
To avoid creating an infinite loop in your integration, ensure that updates originating from CPM webhooks are not sent back to CPM. Your integration should therefore:
- Detect when a Permission or Preference value has changed
- Confirm that the change did not originate from a CPM webhook
- Send the update using the appropriate API:
- Transactions API for Permission updates
- Submissions API for Preference updates
This approach ensures that CPM remains the source of truth for consent and preference history while preventing duplicate updates triggered by webhook notifications.
Managing Citizen Tokens
Citizen Tokens authorise a specific user to view and manage their own consent and preference data. They are required for all frontend flows.
How to Generate Tokens
You may choose:
- On-Demand Token Generation: Use the synchronous endpoint when you need a single token immediately.
- Batch Token Generation: Generate tokens for all Citizens with a job-based system.
See Citizen Tokens for full details.
Token Refresh
All tokens have an expiry date, so you must set up a schedule to update the tokens before they expire. After generating a new token, update the stored token value in your integrated system.
Updating Your Unsubscribe and Preference Management Links
Any email or communication sent from your integrated system must include a link that lets the user manage their permissions and preferences. This link must include the Citizen Token.
Using a Self-Hosted Preference Page
You can embed the Manage Widget directly into your own unsubscribe or manage preferences page.
Example link: https://example.com/preferences?token=<citizen-token>
Using a Hosted Preference Centre
Alternatively, you may use a Hosted Preference Centre provided by CPM. These work with the same token link model and require no hosting on your side.
See Hosted Preference Centres.
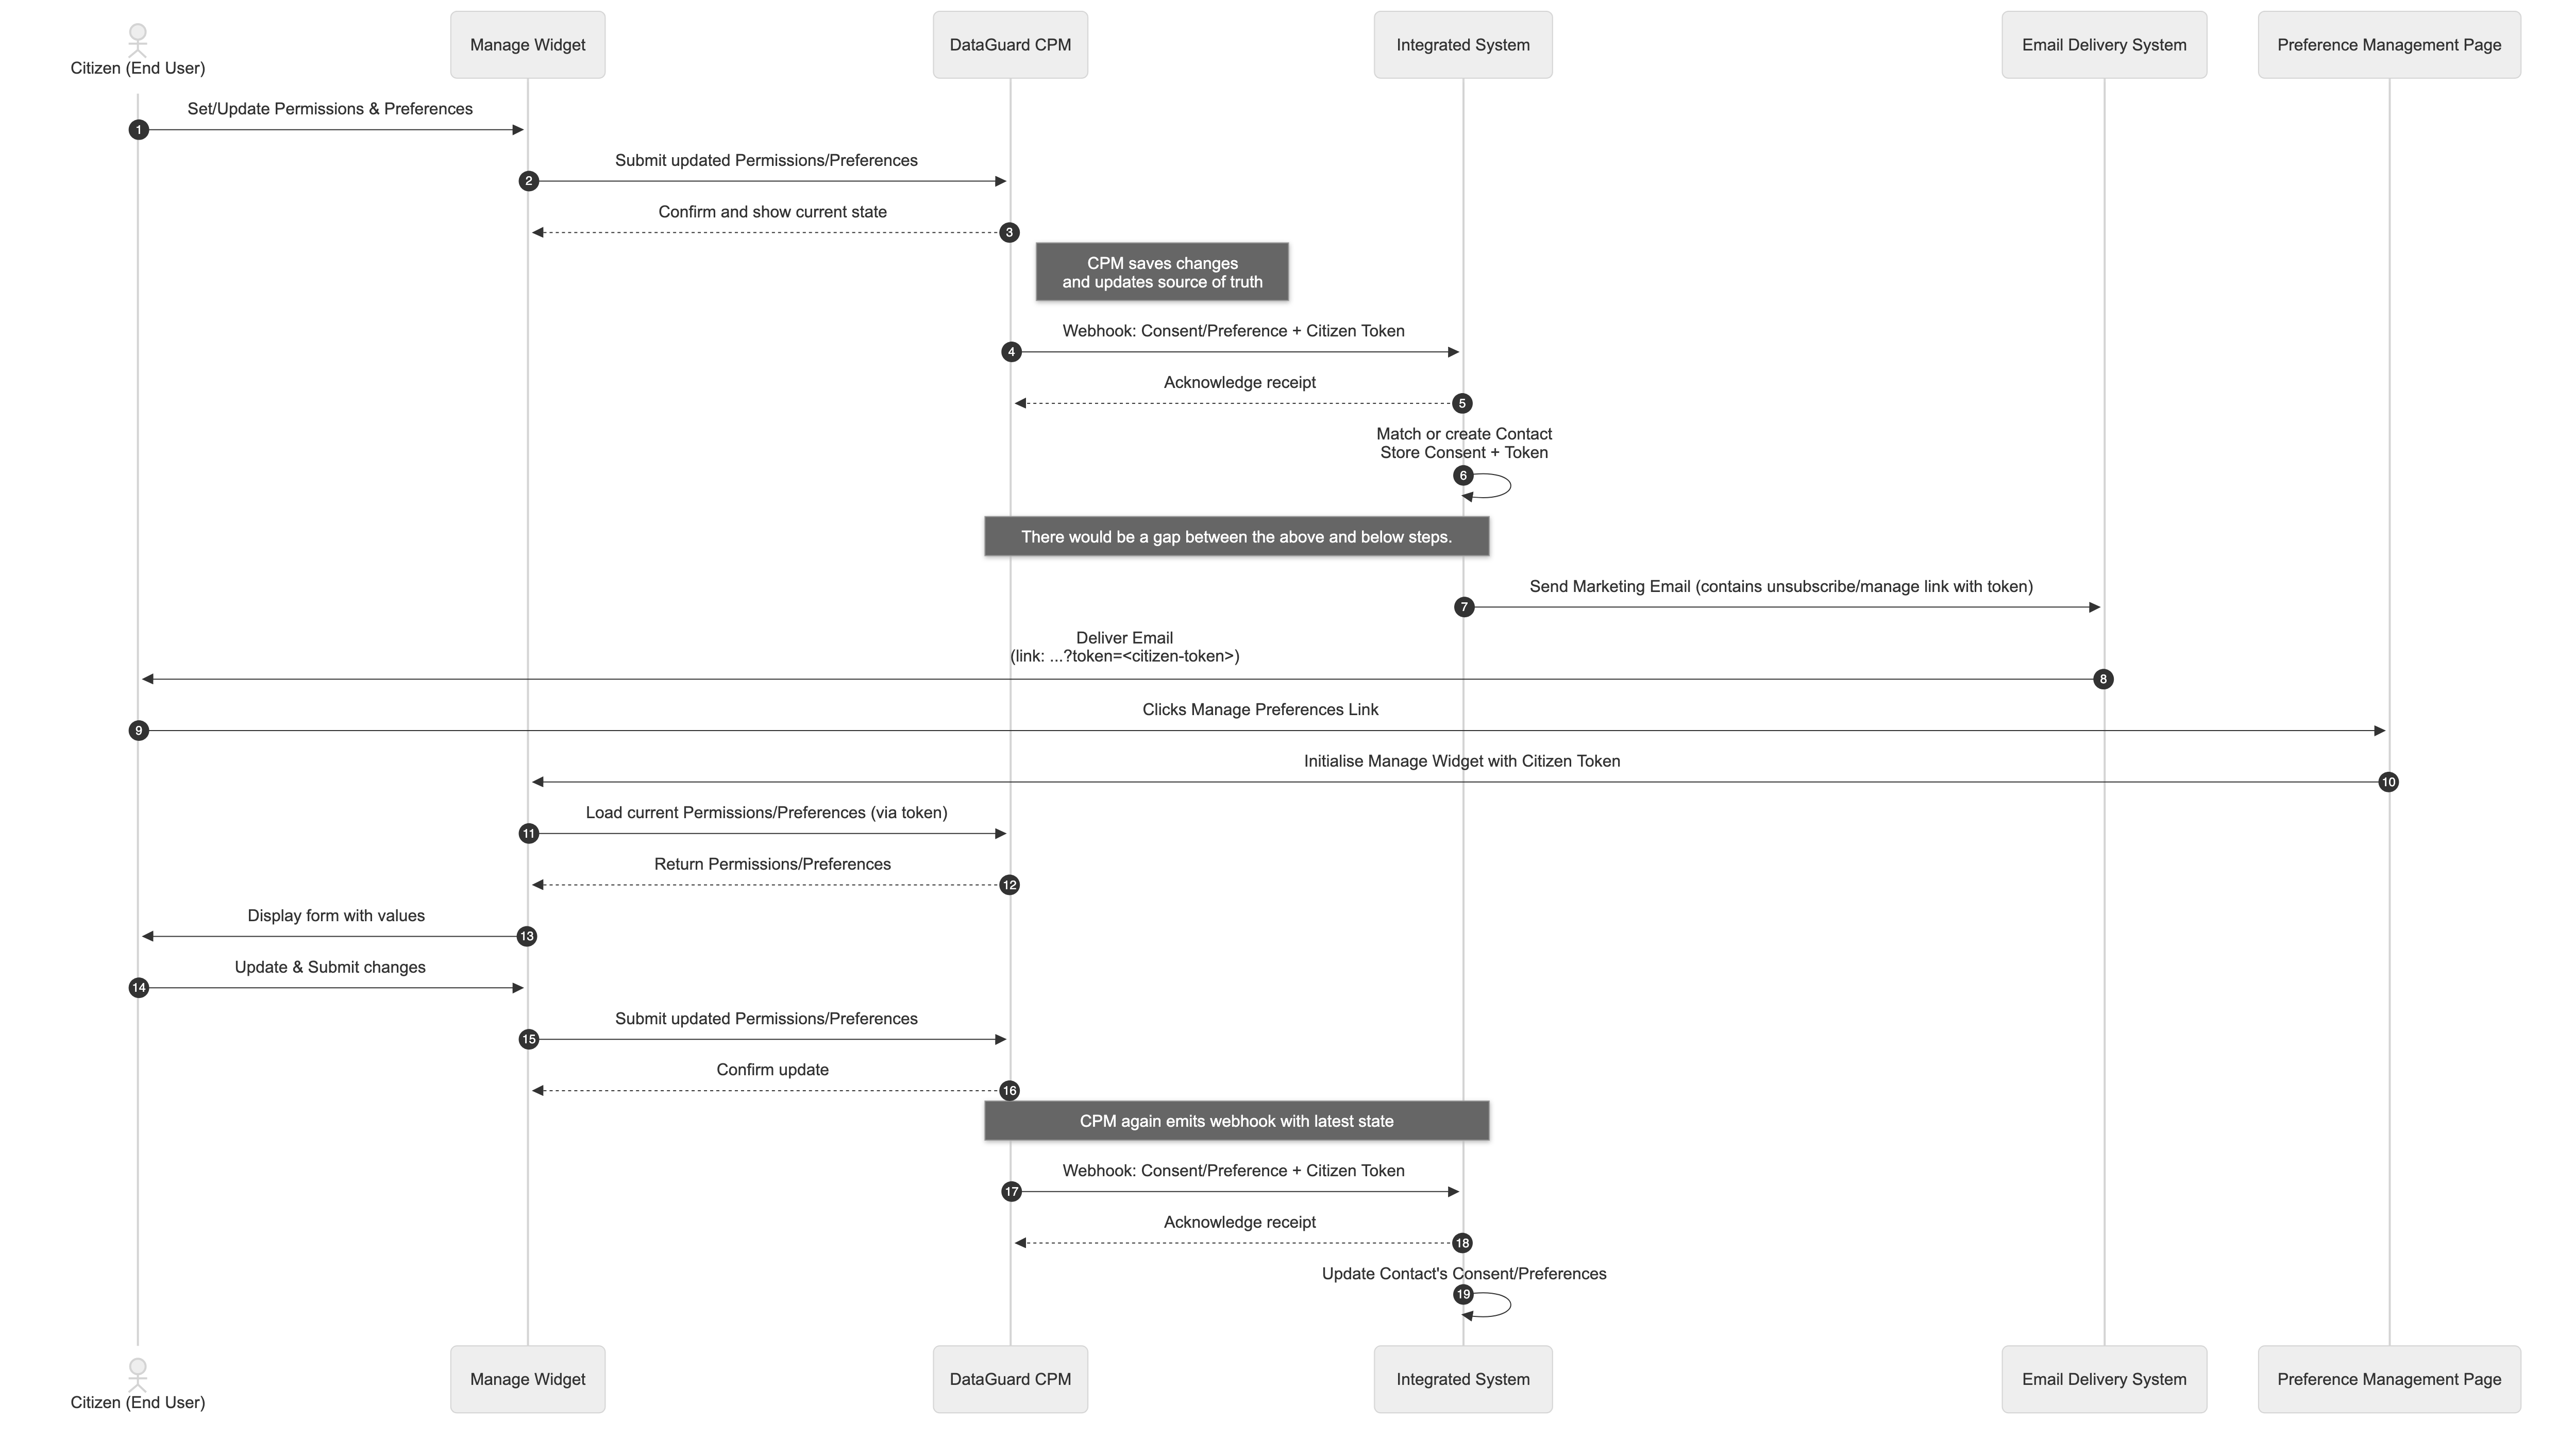
Sequence Diagram
The below diagram demonstrates the sequence events for a typical one-way integration.
Summary
By combining DataGuard CPM’s Webhooks, API, and Citizen Tokens, you can create a robust, secure, and fully automated integration with any CRM or Marketing Automation system. Whether you choose a one-way or two-way integration, the core components remain the same:
- Use webhooks to listen for updates from CPM
- Use the API to push updates from your integrated system
- Store and maintain Citizen Tokens so users can manage their own data
- Embed the Manage Widget or use a Hosted Preference Centre to enable self-service
This integration pattern mirrors the functionality of Marketplace Integrations while giving you full control and flexibility to adapt it to your own tools and workflows.
Updated 8 months ago